Creating A Secure And Scalable Raspberry Pi VPC Network
Establishing a Virtual Private Cloud (VPC) network using Raspberry Pi is an exceptional approach to building a secure, scalable infrastructure for various projects, ranging from home automation to advanced cloud-based solutions. As more individuals and businesses delve into the realms of IoT and cloud computing, Raspberry Pi has emerged as a cost-effective and versatile option for setting up VPC networks. This guide will walk you through the creation of a Raspberry Pi VPC network, offering detailed instructions and expert advice.
Raspberry Pi VPC networks provide practical examples of network configuration, security measures, and scalability. Regardless of whether you're a novice or an experienced developer, this guide will furnish you with the knowledge and tools required to construct a robust VPC network. By utilizing Raspberry Pi's capabilities, you can develop a secure and efficient infrastructure customized to your unique requirements.
In this article, we'll delve into the concept of VPC networks, explore the advantages of using Raspberry Pi for VPC setup, and provide practical examples to help you get started. Additionally, we'll cover essential topics such as network security, IP address management, and troubleshooting tips to ensure your VPC network operates seamlessly. Let’s get started!
Read also:Kaylee Hartungs Journey Through Eye Surgery A Comprehensive Guide
Table of Contents
- Understanding VPC Networks
- Advantages of Raspberry Pi for VPC Setup
- Essential Hardware Requirements
- Software Configuration for Raspberry Pi VPC
- Configuring the Network
- Best Practices for VPC Security
- Managing IP Addresses Efficiently
- Inspiring Raspberry Pi VPC Network Projects
- Helpful Troubleshooting Tips
- Final Thoughts
Understanding VPC Networks
A Virtual Private Cloud (VPC) network represents a dedicated and isolated segment within a cloud environment, enabling you to deploy and manage resources securely. VPC networks empower you to define subnets, route tables, security groups, and access controls, ensuring your infrastructure remains protected from unauthorized access. By leveraging Raspberry Pi, you can create a local VPC network that mirrors the functionality of cloud-based solutions, offering flexibility and control.
Notable Features of VPC Networks:
- Isolation: VPC networks offer a secure and private space for your resources.
- Scalability: You can effortlessly scale your VPC network to meet increasing demands.
- Customization: Tailor subnets, IP ranges, and security policies to suit your needs.
Using Raspberry Pi for VPC setup allows you to experiment with these features in a cost-efficient and hands-on manner, making it an excellent choice for hobbyists and professionals alike.
Advantages of Raspberry Pi for VPC Setup
Raspberry Pi provides numerous benefits when setting up a VPC network. Below are some of the key advantages:
Cost-Effective Solution
Raspberry Pi is an economical device capable of creating a functional VPC network without excessive costs. Its low power consumption and compact design make it ideal for home labs and small-scale projects.
Flexibility and Customization
Raspberry Pi grants you complete control over your VPC network configuration. From subnet definitions to firewall setups, Raspberry Pi offers the flexibility to adapt your network to specific requirements.
Read also:What Is The Gerber Life College Plan And How Can It Help You Save For Education
Learning and Experimentation
Raspberry Pi is an outstanding platform for learning about networking, cloud computing, and IoT. By constructing a VPC network using Raspberry Pi, you can gain practical experience in network configuration and security best practices.
Essential Hardware Requirements
Before initiating your Raspberry Pi VPC network setup, ensure you possess the following hardware components:
- Raspberry Pi (any model with Ethernet support)
- MicroSD card (16GB or higher)
- Power adapter
- Ethernet cables
- Optional: Wi-Fi adapter for wireless connectivity
Having the appropriate hardware ensures a seamless setup process and optimal performance for your VPC network.
Software Configuration for Raspberry Pi VPC
Once you've obtained the necessary hardware, it's time to configure the software for your Raspberry Pi VPC network. Follow these steps:
Install Raspberry Pi OS
Download and install Raspberry Pi OS on your microSD card. This operating system forms the foundation for setting up your VPC network.
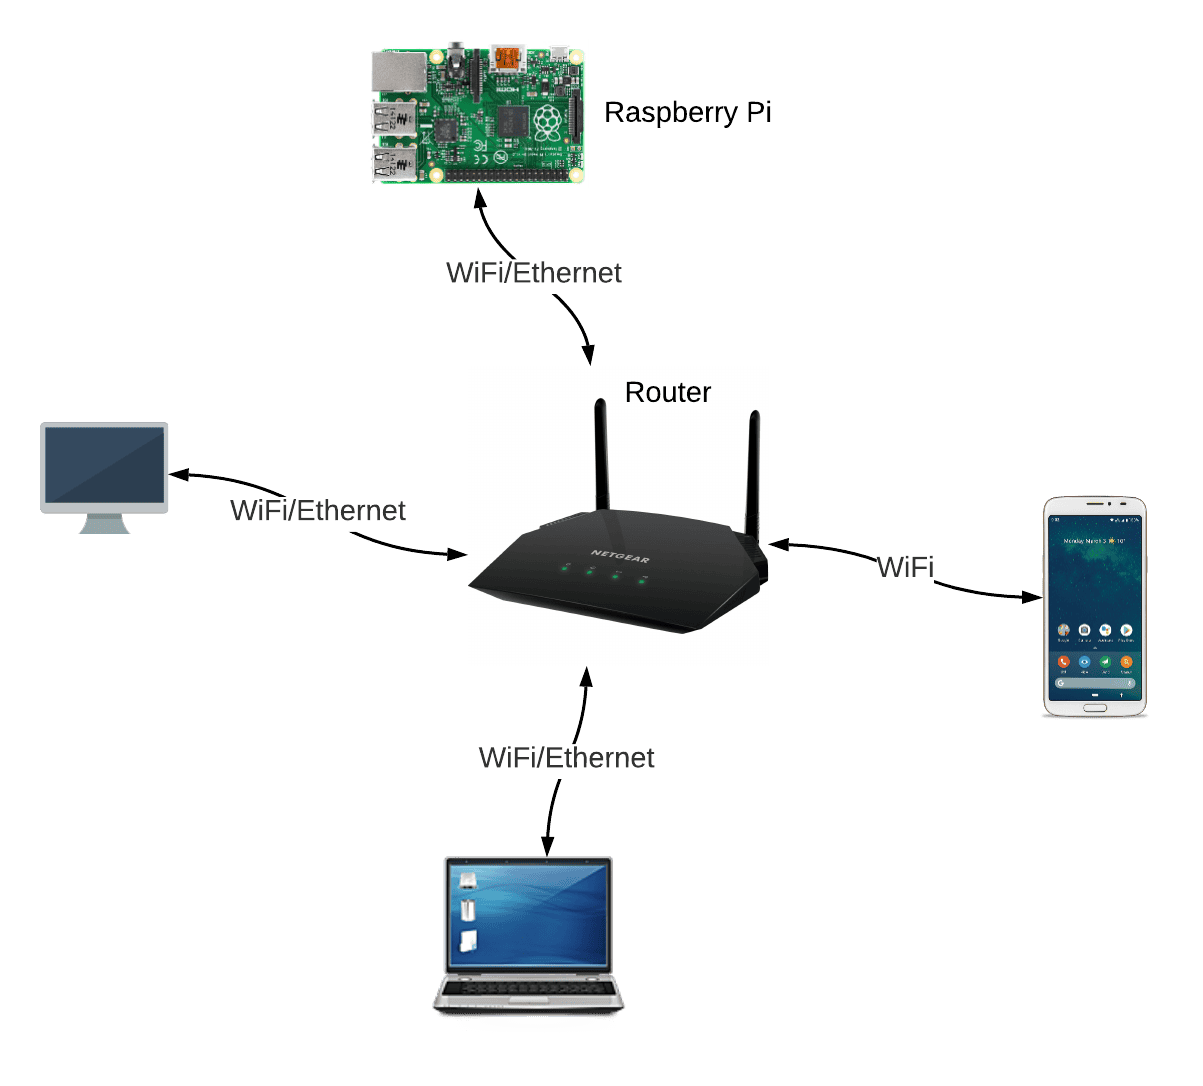
Configure Networking
Set up networking by configuring your Ethernet connection and ensuring your Raspberry Pi can communicate with other devices on your network.
Install Required Software
Install additional software such as Docker, OpenVPN, or other tools you intend to use for your VPC setup. These tools will enhance your ability to manage and secure your network effectively.
Configuring the Network
Network configuration is a crucial step in establishing your Raspberry Pi VPC network. Below are some important aspects to consider:
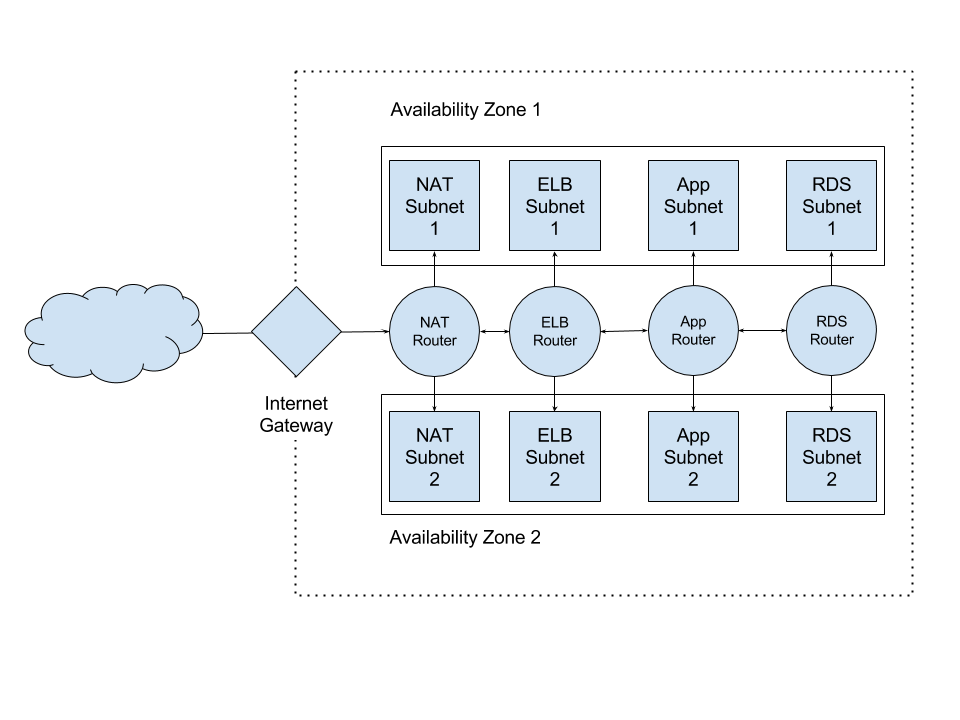
Subnet Definition
Define subnets to organize your network into logical groups. For instance, you can create separate subnets for IoT devices, servers, and client machines.
Route Tables
Set up route tables to specify how traffic should flow between subnets and external networks. Proper routing ensures efficient communication within your VPC network.
DNS Configuration
Configure DNS settings to resolve domain names within your VPC network. This simplifies resource management and service access.
Best Practices for VPC Security
Security is paramount when setting up a VPC network. Follow these best practices to safeguard your infrastructure:
- Utilize strong passwords and robust authentication mechanisms.
- Implement firewall rules to restrict unauthorized access.
- Regularly update your software and firmware to address security vulnerabilities.
By adhering to these practices, you can ensure your Raspberry Pi VPC network remains secure and resilient against potential threats.
Managing IP Addresses Efficiently
Efficient IP address management is vital for maintaining a functional VPC network. Consider the following tips:
Static vs. Dynamic IP Addresses
Determine whether to use static or dynamic IP addresses for your devices. Static IPs are advantageous for servers and critical devices, whereas dynamic IPs can be assigned to less critical devices.
IP Address Ranges
Define IP address ranges for each subnet to prevent conflicts and ensure proper resource allocation.
IP Address Monitoring
Monitor IP address usage to detect and resolve any issues that may arise. Tools such as DHCP servers and network scanners can assist with this task.
Inspiring Raspberry Pi VPC Network Projects
Here are some practical examples of Raspberry Pi VPC network projects:
Home Automation Network
Create a VPC network dedicated to home automation devices, ensuring they function securely and efficiently.
Cloud Storage Solution
Set up a private cloud storage system using Raspberry Pi and a VPC network to store and share files securely.
IoT Device Management
Build a VPC network to manage IoT devices, enabling centralized control and monitoring of connected devices.
Helpful Troubleshooting Tips
Encountering issues during your Raspberry Pi VPC network setup is not uncommon. Here are some troubleshooting tips:
- Inspect network cables and connections for any physical problems.
- Verify IP address configurations to ensure no conflicts exist.
- Review firewall rules to confirm they allow necessary traffic.
By following these tips, you can swiftly identify and resolve any challenges that arise during your VPC setup process.
Final Thoughts
Building a Raspberry Pi VPC network is a fulfilling endeavor that combines the capabilities of cloud computing with the adaptability of Raspberry Pi. This guide has equipped you with the knowledge and tools necessary to create a secure and scalable VPC network tailored to your needs. Remember to follow security best practices and continuously monitor your network for optimal performance.
We encourage you to share your experiences, pose questions, or explore additional articles on our site for more information on Raspberry Pi and networking. Together, let's build a smarter and more secure digital future!


 network using Raspberry Pi is an exceptional approach to building a secure, scalable infrastructure for various proje)